Wednesday 1 August 2012

Wilton Cake Decorating Course - Course 1 (Lesson 1 & 2)

Ok, so I have managed to bake and decorate a few cakes/cupcakes already but I realised that I wanted to learn more. I wanted to 'perfect' my skills, to learn the right way to decorate my bakes. So, much to my mum in-law's encouragement, I decided to enrol for the Wilton Method of Cake Decorating classes as she herself had attended the courses before and found them beneficial.

Course 1 is the basic course which comprises of 4 lessons. Lesson 1 covers all the basics and fundamentals of cake decorating from making and colouring icing, preparing cakes, using the piping bags, piping decorations and etc. For a beginner who has no experience of cake decorating, one will certainly benefit from this basic course. For the experienced baker/decorator, considered it a refresher course ;-) although you may be bored by it..hehe!

For Lesson 2, we were asked to bake a cake (yes, there's HOMEWORK!!!) to decorate in class. We were to learn how to transfer pattern on to the cake using piping gel. For the cake, I chose to bake a strawberry cake, a recipe which i adapted from Sweetapolita's Strawberry Cake recipe. I have always wanted to make a strawberry cake and since Rosie's recipe uses not only real strawberries but strawberry Jell-O (yes, you read that right!) to enhance the flavour, I was intrigued. 

I made a small batch of cupcakes with this batter to taste the cake. Verdict: Maybe it is just me but I find the strawberry cake tasted somewhat like cough mixture to me..haha! I believed that maybe it's the combination of strawberries and milk. Maybe if I were to reduce the milk to half cup instead of 1 cup, the cake would taste better. Will try it next time ;-)

So, back to the cake. I baked an 8' round two layers cake and we had to frost it with the Wilton Buttercream icing (IMO, it is really tooth-achingly sweet!). The base colour was light blue using WIlton Sky Blue Gel colour and was left to 'crust' before we brought the cake to class the next day. We traced the rainbow pattern on the tracing/parchment paper and gently transferred it to the cake. Then with the piping gel as the guide, we outlined the rainbow with the colours of our choice. The rainbow and the clouds were piped using star tip no.16 and the border at the bottom was piped using tip. 21. Since my eldest was into rainbows, I decided to pipe his name on the cake (only to get his complaint that he wanted a REAL rainbow cake...sheesh!!!)


It was definitely a fun class to be in, very informative as you learn tips and see techniques which you will never learn from Youtube. It helps to have a good instructor (Ms Angeline Stanley) and especially with a bunch of wonderful, crazy classmates (a few of us actually, me inclusive!), I was looking forward to the next lessons. 


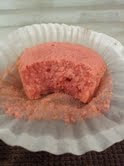
In the meantime, I had to have a slice (or two ;-)) of the cake (who else is gonna eat the cake?) and I am always curious to see how the cake looks like internally (gosh, sounds like a pathologist here)...
I just love the combination of colours on this cake. So pretty....


Stay tune for post on Lesson 3 (Cupcake toppers) & 4 (Graduation cake).


Tuesday 10 July 2012

Floral cupcakes

It has definitely been a while since I posted something new here as I have been very busy lately (ya, who isn't ;-p). Anyway, after making a few cakes for my little girl, friends and grandma, I decided to try making cupcakes. Of course I was happy that I could pipe the usual 'ice-cream' swirls but I wanted something different. That is when through surfing the net, I got the inspiration to do floral cupcakes. Please note that the flowers are not botanically correct but still looked pretty though...hahaha!

Blossoms : I tinted the buttercream pink with Wilton Pink Gel coloring. I used tip no.104 and piped petals on top of the cupcake. Then, I added 3 different sprinkles in the middle (silver dragees, pearl dragees and white jimmies) to see which is prettier. I think I like the pearl dragees best! :-) I have no idea if they are supposed to look like cherry blossoms or apple blossoms which both flowers have only 5 petals. Here, you can see that I have piped 8 petals because I wanted to cover the cupcake. Probably next time I will use a bigger tip or smaller size cupcake.

Dahlias : Ok, I saw in Youtube this technique which the end result was supposed to be pansies. Again, it came out a different flower than I wanted but still look pretty. I tinted the buttercream purple (although looks blue here) and yellow with Wilton Violet and Lemon Yellow Gel colorings. Here, I used tip no.61 and piped the 1st row of petals to cover the top of the cupcake. The 2nd row of petals are smaller and has lesser petals than the bottom. Then, white jimmies and chocolate rice were added.

Roses : This technique is quite straight forward although I have learnt that by using different tips, the rose swirls will look different, i.e., more ruffled or fluffier. You can use any star tip to pipe rose swirls but commonly used is tip 1M (open star tip). You can try using tip 2D (closed star tip) or 1B (bigger closed star tip) for a more ruffled rose or tip 21 for mini cupcakes to pipe rosettes. I usually like to add a small edible deco at the end of the swirl. looks neater and cute that way :-)

Sunflowers : Using Wilton Lemon Yellow Gel coloring to tint the buttercream yellow, I piped a small mount of buttercream in the middle of the cupcake. Then, I used tip no. 80 (U-shaped), piped from the bottom edge of the mount, the 1st row of petals. Repeat the same process until you have 3-4 rows. Here, I added chocolate rice in the middle or you can use small chocolate balls. Hmmm...do they look like chrysanthemums instead? ;-)

Hydrangeas : Inspired by Gloria of Glorious Treats, I wanted to try piping hydrangeas on the cupcake. I tinted the buttercream in 2 colors, i.e., purple and blue using Wilton Violet and Sky blue Gel colorings. I put both colors of buttercream into the same piping bag, fitted with tip 1M. Then, I piped 'stars' all around the cupcake and added a few more on top for a fuller bloom. You can see that the dual tones really makes a difference as real hydrangeas are like that too. Wished  I had a pot of hydrangeas to place my cupcakes against it...hahaha! 


This last one uses a different technique than the earlier rose swirls. I saw this in Youtube by Xanthe Milton, a talented British baker (who reminded me of a Latino actress). Here I used tip no.104 again and piped the petals one by one instead. Since it was my first attempt, I think it looked more like a cabbage than rose to me..hahaha! Probably because there are too many petals on it.

I believe these floral cupcakes are so unique and you definitely don't see these in the bakery. I have to admit that once I started doing one, I was craving to do more. A friend of mine once told me, "Hey, your kitchen is beginning to look like a flower garden!" Oh, how i wished I could have these flowers in my small green patch I call 'garden'. 

Well, I don't have a green-thumb and flowery plants die on me, so, best use my thumb (and other fingers) for piping flowers on cupcakes :-) 


Sunday 24 June 2012

Let her eat cake....or two! Grandma's 90th birthday


Grandmothers...They are always so calm, full of wisdom, gentleness, her heart is a bottomless pit of love and ever so generous with affection. Like a teddy bear, she attracts hugs and cuddles from her grandchildren. They are also the silent pillar of strength that holds the whole family together. Well, my grandmothers anyway...


My paternal grandma lived to be 98 years old and I remembered we celebrated her birthday that year, 11 years ago, in grandeur. In my culture, it is a blessing to the family if an elderly person especially the parents/grandparents lived to be that age. Come on, how many of us get to live that long and be proud of it? :-) When I learnt that my maternal grandma was celebrating her 90th birthday in February, I jumped at the opportunity to do something special for her (and to show off my new found skills ;-) Ha!). I decided to surprise her by baking her a cake...oh, let's make it two!


I got my sister, Felicia to be involved in this mini project and we decided that the bottom tier will be a 12" Chocolate Guinness cake and the upper tier will be a 10" Red Velvet cake. Yes, it was a huge cake as we thought we will be feeding 100 people at the party which turned out to be less. Well, more cakes for everyone?? :-p


We filled and crumb-coated the cakes with cream cheese frosting. For the outer frosting, I was intrigued and inspired by the Rose cake which was created by Amanda from iambaker (a pure genius!!) and my cousin, Tracy who managed to master that technique with much success. As this was my first time doing it, I have come to learn a few things. Firstly, cream cheese is a finicky icing especially in our weather. For this kind of piping especially on a huge cake, it is best to work in an air-conditioned environment. It is frustrating when the frosting keeps getting soft or runny while you are working hard at piping. Secondly, it helps to have a tilting turntable when you need to pipe the side of the cakes. I didn't have one and it was definitely a challenge for me to pipe the roses vertically. Thirdly, with cream cheese frosting, it has to be firm enough especially for piping. Most recipes call for high amount of icing sugar to maintain this consistency. It was indeed, and still is for me, a challenge to find the right amount of icing sugar reduction without compromising the consistency. Ya, it really is a tall order (and you still think baking is easy?) especially with our society which is super sensitive to sweetness nowadays.

I tinted the icing 2 shades of pink with Wilton Pink Gel color, i.e., darker pink for the bottom tier and lighter pink for the top tier.
On the hindsight, I think it would have looked better if the swirls were smaller at the sides. Well, I am still an amateur in all this... :-) Practice makes perfect, they always say! 


And for a more dramatic effect, I made butterflies from fondant and dusted them with pink and blue lustre dust. Don't they look pretty on the cake? :-)


My 'popo' LOVED the cake/cakes as she was pleasantly surprised by it. Even my relatives were surprised (amazed??) as they never knew I could bake. I think it still looked good for a first timer. But the best satisfaction I got from it was when my popo told me that she was so proud of us and she loved the cakes because they were made by her favourite grand-daughters (Awww...isn't that sweet? Ok, allow me some bragging rights here ;-))


Bob Hope once said, "You know you are getting old when your candles cost more than the cake!" As for me, birthdays are Nature's way of telling us to eat cake...or two!

Tuesday 19 June 2012

Every little girl's dream.....to have a doll cake

After I made the doll cake for my little girl, a good friend of mine discovered that I have this 'hidden' talent. Note that the keyword here is 'hidden' as it was hidden from me all this while too..hahaha! I never knew that I could bake a cake, let alone decorate it.


So, she was excited to order one for her daughter's birthday which was few weeks after I made the first one. I was nervous yet excited to be given this opportunity to challenge myself again. Since I was still very new in this, we both decided to go for a similar design but with a different doll. Coincidentally, Zara's favorite color is purple (my life could not be easier! ;)). 

I used a "half" doll and piped her bodice with purple royal icing. I added silver dragees to the bodice to give it a luxe look. I have also learnt a new trick to wrap the doll's long hair with clingwrap to avoid it getting dirty (well, maybe that is supposed to be common sense too...).


I used the same Wilton Classic Mold to bake a chocolate cake for the skirt, covered in Swiss Meringue Buttercream after the cake is completely cooled and added the royal icing flowers to it.  So, after that was done, it was time to 'dress' the doll....
In my opinion, this definitely looked better than my daughter's cake as practice makes perfect, so they say. I was definitely more confident in doing this doll cake the second time around. The chocolate cake was moist enough and everyone loved it. YAY!

Of course, the most important person, the birthday girl herself was so happy to get a doll cake for her birthday and in purple some more. Here is a picture of her posing next to her cake....


Seeing her glowing face like that made me the happiest baker in town. That is what matters most, right? To me anyway...It gives me the motivation and stirs the passion in me to be better in what I do.


For that, I am thankful (and happy) to make this little girl's dream come true :-)

Sunday 17 June 2012

How it all began....

I don't bake...ok, that's not entirely true. I bake seasonally, that is, once a year, for Christmas. After I got an oven 9 years ago, during the first 8 years, I have only used theoven 5 times (twice to bake Christmas cookies, twice to make Shepherd's pie and once to heat up leftover pizzas). See, I could still count and remember them..hahaha.
As this is officially my first blog, I pondered on what to share...then I thought, why not about my very first bake? :-) and when better to officiate my blog than on my parents' anniversary which is today, 17th June! I owed my existence to them and they have always been so loving and supportive..

When I quit my job last December to be a SAHM, I suddenly had time in my hands..so to speak. So, when my youngest daughter was about to celebrate her 1st birthday in January this year, my dear hubby asked me to bake her a doll cake. I was like, "what?? Excuse me, U definitely have a super high level of confidence in me, for someone who rarely bakes, you want me to bake her a doll cake?" then he went on to tell me that his sister had a doll cake made by my MIL, so Kristianne should have one too...

Boy, was I stressed!!! Immediately, I googled and searched the net for inspiration. I managed to get the Wilton Classic Mold which came with a half doll. I thought the mold/pan was excellent since it was a fluted shaped one already which forms the dress of the doll. Then came the cake...hmmm...which recipe should I try....so, I settled for Cream cheese pound cake (rather ambitious aren't we?)! I was EXCITED to begin...


I began making royal icing flowers to decorate the skirt 2 weeks in advance. So, the day before the party, I made the cake/skirt. I've overlooked that the batter was too much for my humble Philips 3L mixer which resulted in the batter not mixed properly and I forgot to scrape the sides of bowl too (which I've learnt from many experienced bakers, it's an important step!!). The cake took longer than the recommended time to bake..as a result, the cake was very dry. I decided to decorate it anyway...


As u can see, I used a different doll instead which was a real doll actually given by my MIL. Turned out the skirt was too big for the doll...hahaha! Anyway, being my first attempt, for an amateur, i think it still looked pretty, simple and cute. 'A' for effort.. :-) 


Of course, much improvement is required for the taste and texture of the cake....and to omit almond extract from my cakes (I found out that it's an acquired taste and not many in my family like it). All in all, it was a good learning experience.

Kristianne at her 1st bday party


And so, the adventure begins....